Tenda
  • Homepage
  • Home Network
    • Whole-Home Wi-Fi
    • Routers
    • Modems/ Gateways
    • Network Expansion
    • Adapters
  • Business Network
    • Switches
    • Gateway
    • Optical Access
    • Enterprise Wireless
    • CPE&Basestation
    • Cloud Service
  • Video Surveillance
    • IP Camera
    • Network Video Recorder
    • Video Security Kit
  • Where to Buy
    • Amazon UK
    • Amazon France
    • Amazon Germany
    • Amazon Spain
    • Amazon Italy
    • Amazon US
  • Help Center
    • Technical Support
    • Contact us
    • Product Center
    • Tech Specs
    • QIG Center
    • Download Center
    • FAQ Center
    • Video Center
    • Emulator Center
    • EOL Center
  • Profile
    • Profile
    • Contact Us
    • News
  • Choose language
Tenda

EN

Global / English / EN
Global-English Argentina-Español Australia-English Bolivia-Español Brazil-Português Bulgaria-Български език Central America and Caribbean-Español Chile-Español China-简体中文 Colombia-Español Czech-English Denmark-English Ecuador-Español Egypt-English France-Français Germany-Deutsch Greece-Ελλάδα Hongkong,China-繁體中文 India-English Indonesia-English Iraq-English Italia-Italiano Kazakhstan-English Kenya-English Mexico-Español Nordic-English Norge-English North Africa-English Peru-Español Poland-Polski Romania-Română Russia-Русский Saudi Arabia-English South Africa-English Spain-español Suomi-English Sverige-English Taiwan,China-繁體中文 Thailand-ไทย Turkey-Türkçe Ukraine-Українська United Arab Emirates-English United States-English Uruguay-Español Uzbekistan-Русский Venezuela-Español Vietnam-Tiếng Việt Nam
  • Home Network

    Product Center

    Home Network

    Where to Buy

    QIG Center

    Tech Specs

    Whole-Home Wi-Fi

    Good coverage for the whole home

    • New
    • Wi-Fi 6 Mesh
    • Wi-Fi 5 Mesh

    Routers

    More stable and reliable Wi-Fi Signal

    • New
    • Wi-Fi 7 Routers
    • Wi-Fi 6 Routers
    • Wi-Fi 5 Routers
    • Wi-Fi 4 Routers

    Modems/ Gateways

    Navigate to the internet

    • 5G Routers
    • 4G Routers
    • Mobile Wi-Fi
    • xDSL Modem

    Network Expansion

    Improve your network coverage

    • SOHO Switches
    • Powerline
    • Range Extenders

    Adapters

    Equip your devices for a faster Wi-Fi

    • PCIe Adapters
    • USB Adapters
  • Business Network

    Product Center

    Business Network

    Where to Buy

    QIG Center

    Tech Specs

    Switches

    Highly available design for a wide range of environments

    • New
    • Smart Switches
    • Managed Switches
    • Unmanaged Switches
    • PoE Switches
    • Cloud Switches
    • Media Converter
    • Accessories

    Gateway

    Navigate to the internet

    • Wireless Enterprise Router
    • Wired Enterprise Router

    Optical Access

    FTTX Solution

    • OLT
    • ONT
    • ONU
    • Accessories

    Enterprise Wireless

    Centralized Management

    • Ceiling AP
    • Desktop AP
    • In-wall AP
    • Outdoor AP
    • AP Controller

    CPE&Basestation

    Strict transmit performance requirements

    • Outdoor CPE
    • Antenna
    • Basestation

    Cloud Service

    Professional business manager

    • CloudFi Cloud
    • CloudFi App
  • Video Surveillance

    Product Center

    Video Surveillance

    Where to Buy

    QIG Center

    Tech Specs

    IP Camera

    Be your security guard

    • New
    • Home Security
    • SMB Securiy

    Network Video Recorder

    Robust recording and superior storage

    • PoE & Non-PoE

    Video Security Kit

    Easy to connect and simple to set up

    • Wi-Fi Kit
    • PoE Kit
  • Help Center

    Product Center

    Where to Buy

    QIG Center

    Tech Specs

    Download


    • Datasheet
    • Installation Guide
    • Firmware
    • User Guide
    • User Manual
    • HD Image
    • Drivers
    • CE
    • GPL

    FAQs


    • QA
    • Features&Configuration
    • Troubleshooting
    • Others

    Help Center


    • Contact us
    • Product Center
    • Download Center
    • FAQ Center
    • Video Center
    • Emulator Center
    • QIG Center
    • EOL Center

    Where to Buy


    • Amazon UK
    • Amazon France
    • Amazon Germany
    • Amazon Spain
    • Amazon Italy
    • Amazon US

    Service Provider


    • Privacy Statement
    • Discontinuation Policy
  • Partners
    • i36
    • AC3
    • V15
    • TE3L
    • RE3L
    • CH7-WCA
    • RH7-WCA
    • TC3T24C
    • TC3B24C
    • TN3104-4P
  •   
    •   QA
    •   Features&Configuration
    •   Troubleshooting
    •   Others

How to setup D301 or D151 as a router only

 2013-08-27   13999

This Article Applies to: D151  

How to setup D301/D151 as a router only?

D301/D151 has two modes of operation: one for ADSL uplink which is ATM Interface (working as a modem-router) and the other one for Ethernet link which is ETH Interface (working as a router only). This article will guide you on how to set up D301/D151 as a router only without a setup CD.

Part 1: Connect the devices together

Part 2: Login into the web-based setup page

Part 3: Internet Setup

Part 4: Test Internet connectivity&trouble shooting

Part 5: Setup wireless network


As we can see from the picture below, there are one DSL port and 4 Ethernet ports on the back panel. Connect your devices together as the following steps.
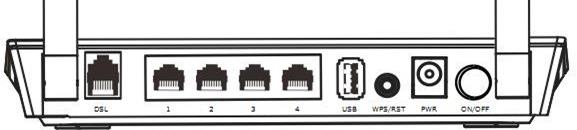
Step 1:

Connect one end of an Ethernet cable to your computer and the other end to an Ethernet port at the back of D301/D151.

Step 2:

Plug the Internet cable (maybe comes from your modem) into another Ethernet port (only can be port 2, port 3 or port 4).

Step 3:

Check the indicators on the front panel. Ensure that the PWR is on, the SYS and DSL are blinking, 2 LAN ports which you have plugged the Ethernet cables into are on or blinking, and WLAN is on or blinking.

Before logging into the web-based setup page, you should verify that your computer has obtained a valid IP address. For instructions on how to obtain a proper IP address, click here for help.

Launch a web browser like Internet Explorer, Firefox, Safari, etc., enter default IP address 192.168.1.1 in the address bar, and then press [Enter].

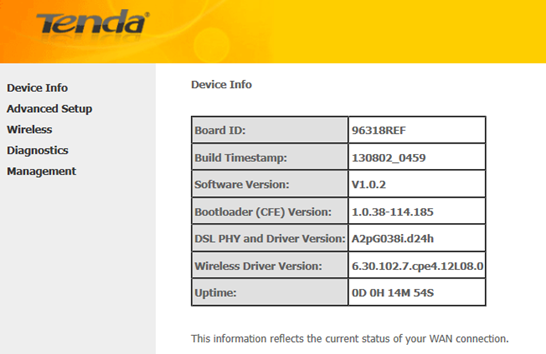
Note: If you’ve changed the default IP address, you should enter the one you changed to. You will then be directed to a Tenda web-based setup page as the following picture.

Step 1:

Click the  button on the top-right of the initial page. You will see the following page.

Step 2:

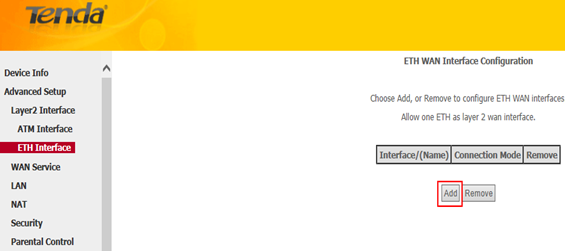
Select Advanced Setup > Layer 2 Interface > ETH Interface. After you have got to ETH Interface, click on Add button.

Step 3:

You will be asked to select an ETH port (Ethernet port) in the next page.

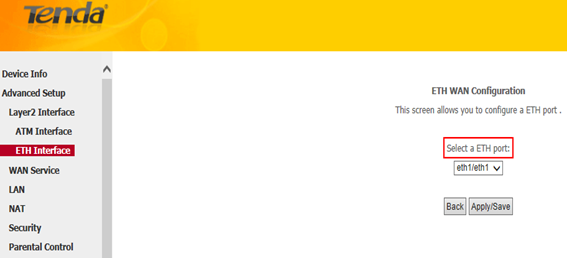
Note: The Ethernet port s here is to function as a WAN port. Only one LAN port can be configured as the WAN port at a time. Eth 1 corresponds to port2; eth 2, port 3; eth 4, port 4.
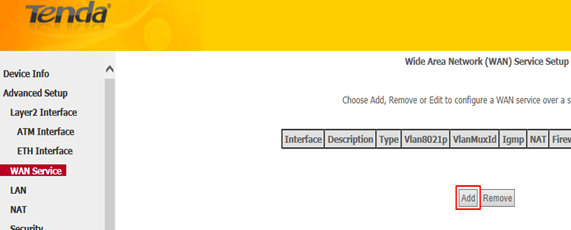
Step 4:

In the left main menu, select WAN Service under Advanced Setup. Click Add button.

Step 5:

Simply click on Next in the new page and you will be directed to below page.

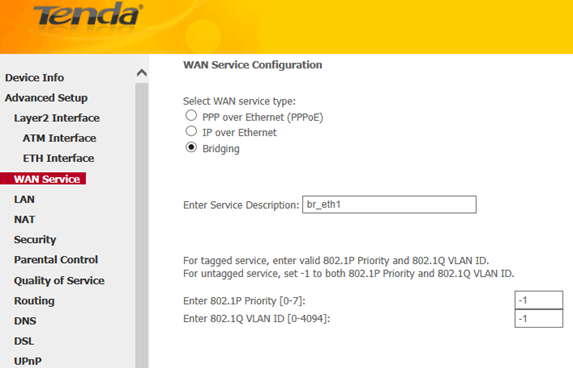
Note: Only two Internet connections: PPP over Ethernet (PPPoE) and IP over Ethernet (IPoE) are available for working as a router only.

Step 6:

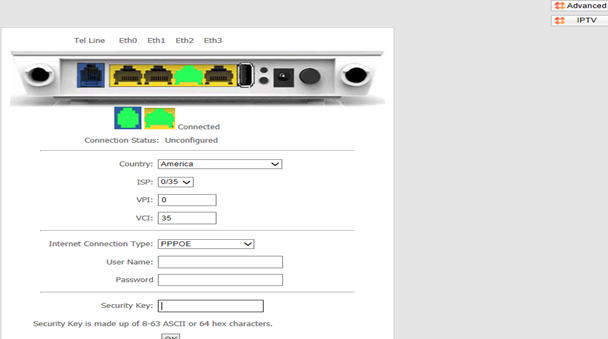
Select your WAN service type (Internet connection type) correctly, if you have no idea about which one to choose, you can contact your ISP (Internet Service Provider) for help.

For instructions on PPP Over Ethernet (PPPoE), click here.

For instructions on IP over Ethernet, click here.

l  PPP Over Ethernet (PPPoE)

i. For PPP over Ethernet (PPPoE)

Select PPP over Ethernet (PPPoE) and select a network protocol: IPv4, IPv6 or IPv4 & IPv6 (dual stack). Click Next.

Note: If you select IPv6 or IPv4 & IPv6 (dual stack), check Launch Dhcp6c for Prefix Delegation (IAPD). If your ISP is using stateful DHCPv6, check Launch Dhcp6c for Address Assignment (IANA) also. Or configure a static IP address.

ii. Enter the username and password provided by your ISP in the following page, and then click on Next to continue.

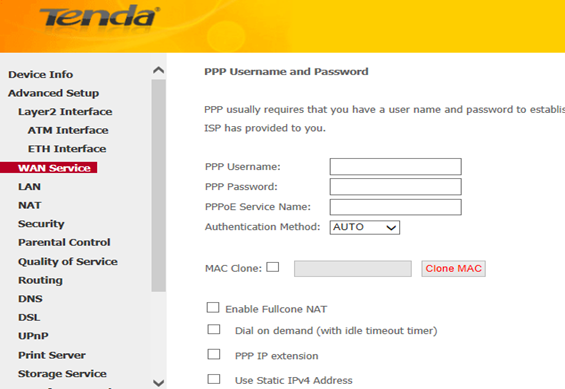
Note: You can tick MAC Clone and click on Clone MAC in case that your ISP registered the MAC address of the network interface card in your computer when opened your account the first time, and limit the Internet access in this way.

iii. Simply click on Next again (leave other options alone) in the next two pages and click on Apply/Save at last.

l  IP over Ethernet

Select IP over Ethernet and select a network protocol: IPv4 (most common used), IPv6 or IPv4 & IPv6 (Dual Stack). Click Next.

i. For IPv4, you will see below page.

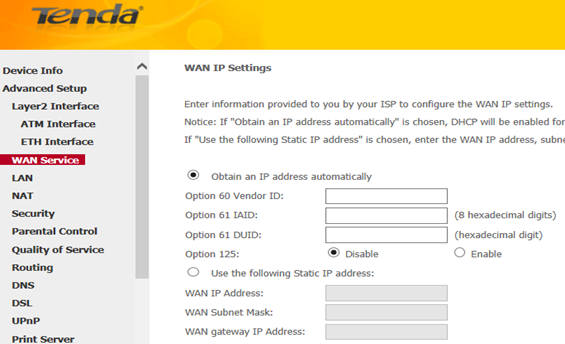
If you don’t have a fixed IP from your ISP, tick Obtain an IP address automatically and click on Next. Simply click on Next again in the next page (leave other options alone) and click on Apply/Save at last.

If you have a fixed IP given by your ISP, tick Use the following IP address and enter the IP information in the blanks.

ii. For IPV6/IPv4 & IPv6 (Dual Stack), you will see below page.

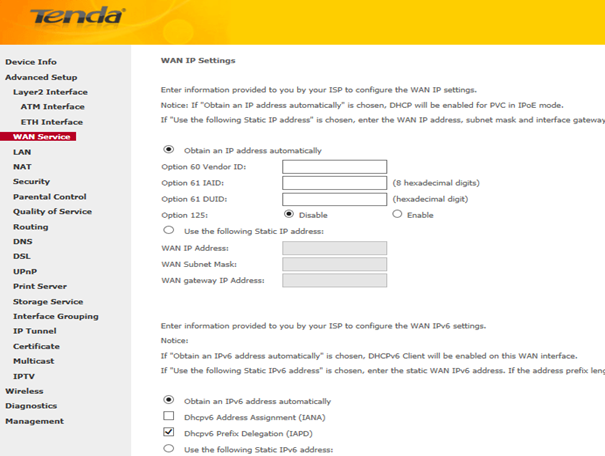
If you don’t have a fixed IPv6 address from your ISP, tick Obtain an IPv6 address automatically and click on Next. Simply click on Next again in the next page (leave other options alone) and click on Apply/Save at last.

Note: If your ISP is using stateful DHCPv6, check Launch Dhcp6c for Address Assignment (IANA) also.

If you have a fixed IP given by your ISP, tick Use the following Static IPv6 address and enter the WAN IPv6 Address/Prefix Length and WAN Next-Hop IPv6 Address. Click on Next.

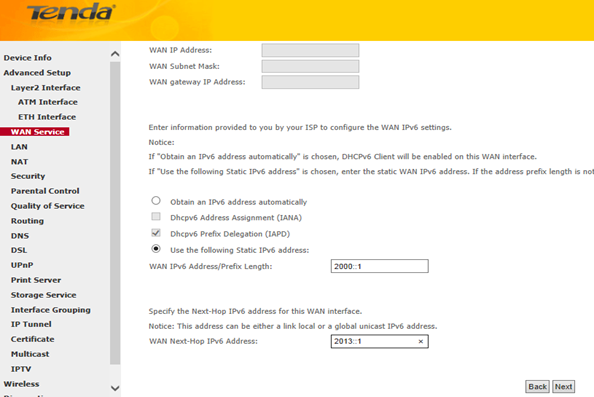
Leave other options alone and simply click on Next in the next page. You will see below page.

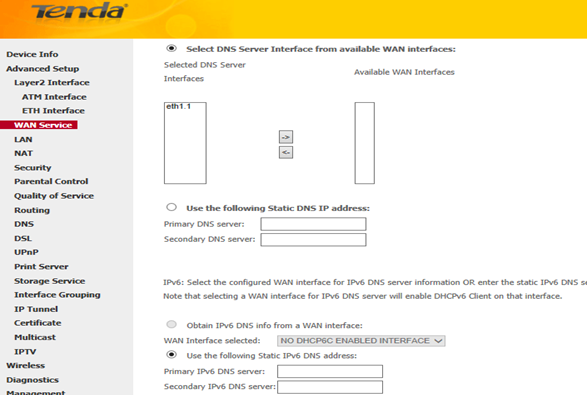
Select Use the following Static IPv6 DNS address and manually enter the DNS server address. If you have two DNS server addresses, enter the second also. Click on Next and click on Apply/Save at last.

Launch a web browser and enter www.tendacn.com. If the webpage is opened, it means you have got Internet access now.

Trouble shooting:

If you cannot access the Internet, you may try below solutions:

i. Power cycle the Tenda device and your computer.

ii. Change the LAN IP address.

iii. Reset the Tenda device and check the essential information from your Internet Service Provider.

l  Power cycle the Tenda device, your computer and your modem if any

Step 1:

Unplug the power adapter from your modem first, then the Tenda device. Shut down your computer.

Step 2:

Power on the modem first, then the Tenda device, wait for its lights on, and then turn on the computer.

l  Change the LAN IP address.

Select Advanced Setup > LAN from the left main menu; change the IP address 192.168.1.1 to 192.168.X.1, like 192.168.5.1. Leave other options alone and click Apply/Save.

l  Reset the Tenda device

Find a WPS/RST button on the back panel of the Tenda device and hold down it for about 10 seconds. During which time, you will find that all the indicators turn off and several of them will back on later. All of the customized settings of the D301/D151 will be erased after resetting. 

Check IP information from your Internet Service Provider and also check if you have plugged the Internet cable to the port which you specified as a WAN port and setup it again.

Note: If all the efforts you’ve made are in vain, you’d better ring your Internet Service Provider for help to check the Internet connection.

Step 1:

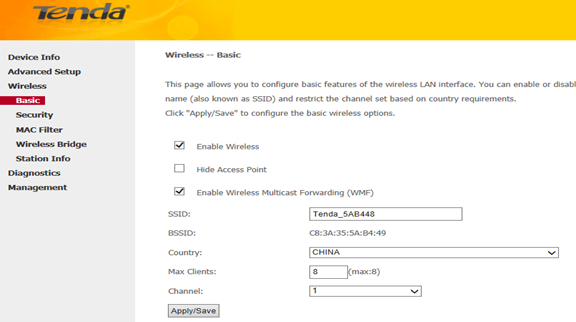
Select Wireless > Basic from the left main menu. You will be directed to the following page.

Step 2:

Locate the SSID, which is the name of your wireless network, and change the default name Tenda_XXXXXX to another name with several letters or numbers or mixed. Select your country and click on Apply/Save.

Step 3:

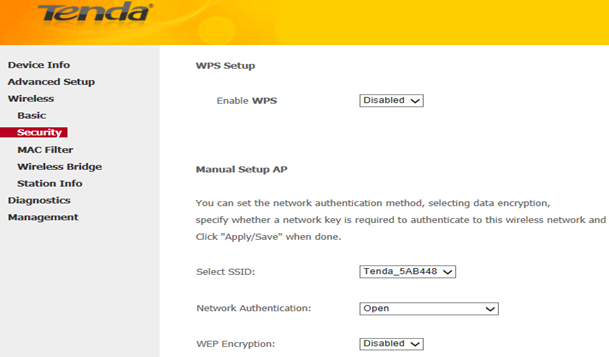
Select Wireless > Security from the left main menu. You will be directed to the following page.

Step 4:

Locate the Network Authentication, it is highly recommended to select WPA-PSK, WPA2-PSK, Mixed WPA/WPA2-PSK as the Network Authentication. Set a wireless password in the blank of WPA/WAPI pass phrase with at least 8 characters. Select AES as the WPA/WAPI Encryption and click on Apply/Save at last.

Note: To set a wireless password, WPS Settings should be disabled first.


Related Articles:

How can I connect to a wireless network?


Download this article:

How to setup D301 or D151 as a router only


Solved(0)
Unsolved(0)
Others
How to setup D301 or D151 as a modem-router How to setup D301 or D151 as a modem-router
Contact us
Tenda Headquarters support@tenda.cn
Tenda ISP、OEM、ODM sales.isp@tenda.cn +86-189-2387-8539
Tenda Kazakhstan akaledich@tenda.cn +7 707 704 44 42
Tenda France support.fr@tenda.cn +33 9 70 01 92 25
Tenda Germany support.de@tenda.cn +49 (89) 26205949
Tenda United Kingdom support.uk@tenda.cn +44 (800) 0418955
Tenda Italy support.it@tenda.cn +39 0299257916
Tenda Spain support.es@tenda.cn +34 911 62 71 41
Tenda Romania support.ro@tenda.cn +40730280109
Tenda Poland support.pl@tenda.cn 48573346795
Tenda Ukraine support.ua@tenda.cn +08 0021 7177
Tenda Russia support.ru@tenda.cn 8(800)2502344
Tenda Turkey support.tr@tenda.cn +90 2165102220
Tenda South Korea support.kr@tenda.cn +86 19521468095
Tenda Taiwan,China support.hk@tenda.cn +86 19521468095
Tenda HongKong,SAR support.hk@tenda.cn +86 19521468095
Tenda India support.in@tenda.cn +91-8000-2000-56
Tenda Thailand support.th@tenda.cn
Tenda Vietnam support.vn@tenda.cn +18006674
Tenda Indonesia support.id@tenda.cn +62 21 38269084
Tenda Malaysia support.my@tenda.cn +60 1800815746
Tenda Philippines support.ph@tenda.cn +63(2)8353-3321
Tenda Australia support.au@tenda.cn +1300 836 320
Tenda Chile support.cl@tenda.cn +56 9 9238 7476
Tenda Argentina support.ar@tenda.cn
Tenda US & Canada support.usa@tenda.cn +1 800 570 5892
Tenda Columbia support.co@tenda.cn +57 318 7868668
Tenda Brazil support.br@tenda.cn +55 11 99285-8568
Tenda Mexico support.mx@tenda.cn +52 55 5547 4176/+52 55 5536 8100
Tenda Peru support.pe@tenda.cn +51 940952471
Tenda Egypt support.eg@tenda.cn +2024039510
+201066563999/+201025399888
Tenda United Arab Emirates support.ae@tenda.cn +971 4 8819766
Tenda South Africa support.za@tenda.cn +27 87 821 7187
Tenda Iraq support.iq@tenda.cn
Tenda North Africa support.mo@tenda.cn +212 679 200 025
Tenda Pakistan support.pk@tenda.cn +92 3334248751
Tenda Kenya support.ke@tenda.cn
  •  +86 755-2765 7180
  • support@tenda.cn
Home Network
Whole-Home Wi-Fi
Routers
Modems/ Gateways
Network Expansion
Adapters
Business Network
Switches
Gateway
Optical Access
Enterprise Wireless
CPE&Basestation
Cloud Service
Video Surveillance
IP Camera
Network Video Recorder
Video Security Kit
Self-service
Technical Support
Product Center
Tech Specs
Download Center
FAQ Center
Video Center
Emulator Center
QIG Center
EOL Center
Where to Buy
Amazon UK
Amazon France
Amazon Germany
Amazon Spain
Amazon Italy
Amazon US
Profile
About Us
Contact Us
News
Milestone
logo
  • Privacy Statement
  • Discontinuation Policy
   
All rights reserved © 1999-2023 Shenzhen Tenda Technology Co.,Ltd.
 Global / English/ 

Tenda Technology Tower ,#1001 Int' l E-City Zhongshanyuan Road,Nanshan District, Shenzhen China 518052